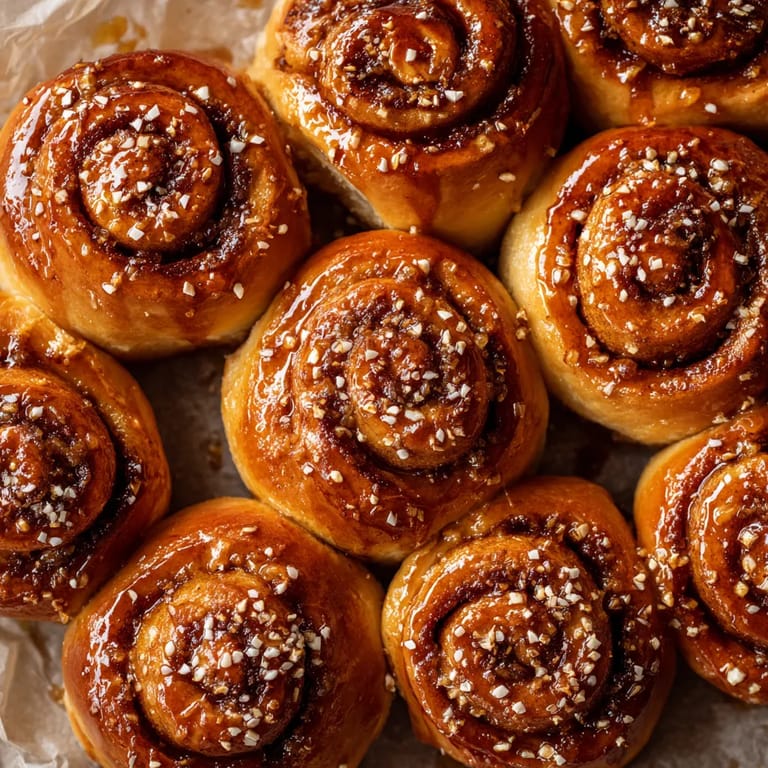
 Save to Pinterest
 Soft swirl honey buns have been my favorite way to bring a bakery feeling home ever since I first tasted them warm out of my oven. These tender, golden treats fill the kitchen with sweet cinnamon scent and become unforgettable once you glaze them while still warm. If you love a classic honey bun but want to experience it even better fresh, this is the recipe that turns a simple day into something special.
I first made these honey buns for a Saturday family breakfast and now they are our go-to for birthdays and holiday mornings. The way the honey glaze seeps into every swirl makes them even more delicious than any store-bought version.
Ingredients
- All-purpose flour: gives these buns their pillowy structure and softness choose a fresh unbleached flour for best results
- Granulated sugar: brings sweetness and helps the dough stay tender
- Salt: enhances the flavors and balances the sweetness so every bite is just right
- Whole milk: keeps the dough moist and fluffy use whole milk for richness
- Instant yeast: makes the dough rise quickly and evenly always check that your yeast is active
- Unsalted butter: adds richness and a slight buttery finish to both dough and glaze
- Large egg: gives structure and a lovely golden color to the buns
- Vanilla extract: uplifts the smell and taste look for pure vanilla for the best depth
- Vegetable oil: helps with dough proofing and creates a crisp but soft-fried finish choose a neutral oil
- Ground cinnamon: delivers that classic swirl flavor pick a fresh spice for strong taste
- Powdered sugar: makes the icing glossy and smooth always sift for lump-free glaze
- Honey: sweetens and gives the glaze a sticky irresistible shine local honey can add even more aroma
Tired of Takeout? 🥡
Get 10 meals you can make faster than delivery arrives. Seriously.
One email. No spam. Unsubscribe anytime.
Tips
Use a kitchen thermometer when heating milk and oil for accuracy Fresh active yeast is essential for a good rise
Step-by-Step Instructions
- Mix the Dry Ingredients:
- Combine the flour sugar and salt in the bowl of a stand mixer or large mixing bowl so everything is evenly distributed before adding wet ingredients
- Prepare Wet Ingredients:
- Warm the milk just to 110 degrees then whisk it with instant yeast melted butter egg and vanilla This brings everything together and activates the yeast gently
- Combine and Knead the Dough:
- Pour wet ingredients into the dry mixture and knead on medium speed for ten minutes until a soft slightly sticky dough forms If mixing by hand work the dough vigorously until smooth
- First Rise:
- Grease a large bowl with vegetable oil Turn the dough into a ball and place in the bowl Cover with plastic wrap and let it rise in a warm spot until doubled in size usually about one and a half hours
- Shape the Buns:
- Punch down dough and move to a lightly floured surface Pat or roll into a rectangle about fifteen by eight inches This step keeps buns even and tender
- Add the Cinnamon Swirl:
- Evenly sprinkle ground cinnamon over the flattened dough so every bun gets cinnamon flavor
- Roll and Cut:
- Roll the dough up tightly from the long side making a spiral Pinch the edge to seal Using dental floss or a sharp knife slice into fourteen even rounds
- Second Rise:
- Arrange the buns on parchment or wax paper Set them a little apart to allow for spreading Mist the tops lightly with cooking spray Cover loosely with plastic and let them puff up for thirty minutes
- Fry the Buns:
- Heat vegetable oil in a heavy-bottomed pan to precisely 350 degrees Gently fry two to three buns at a time one to two minutes per side until golden Use tongs or slotted spoon to remove and drain buns on paper towels
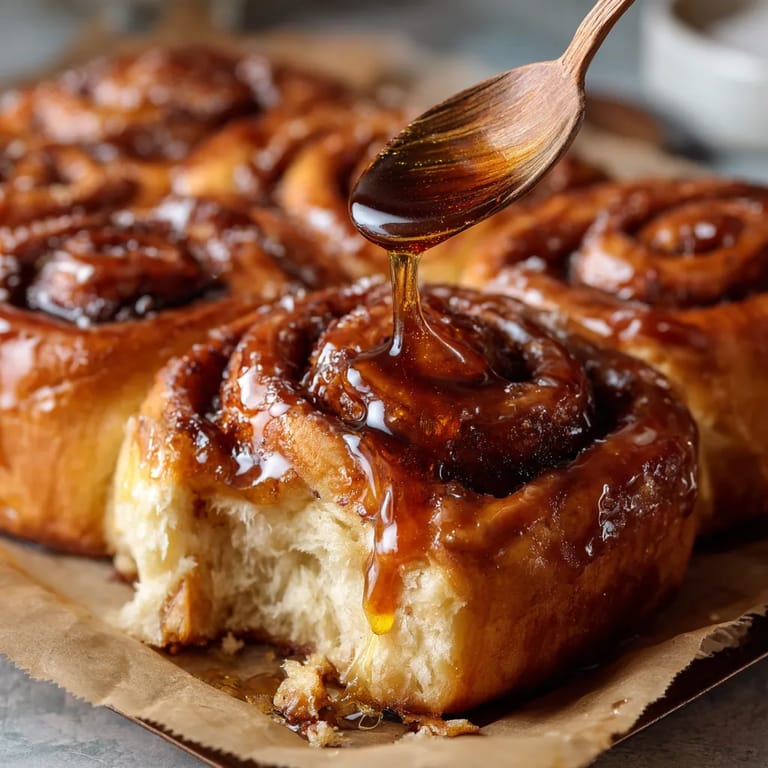
- Make the Glaze:
- Whisk together melted butter powdered sugar milk honey and vanilla until completely smooth and pourable
- Ice the Buns:
- While buns are still warm dip the tops in glaze or slowly drizzle the glaze over each bun Set buns on paper or a rack to allow the icing to set and shine
 Save to Pinterest
 The honey in the glaze brings a floral note that truly elevates these above the usual bakery variety Sometimes I let my daughter help with the glazing and the kitchen fills with laughter and sugar trails This recipe carries memories of sticky fingers and morning light
Storage Tips
Keep honey buns in a sealed container at room temperature for up to two days to maintain their softness For longer storage you can freeze the buns tightly wrapped for up to eight weeks Thaw at room temperature and glaze right before eating for the bakery-fresh effect
Ingredient Substitutions
If you need to swap ingredients try bread flour for extra chewy texture though all-purpose is classic Non-dairy milk such as oat or almond can substitute for whole milk but will change the flavor a bit For a glaze twist use maple syrup instead of honey or even add zest of orange for a bright twist
Save to Pinterest Serving Suggestions
Serve honey buns slightly warm with a mug of fresh coffee or a glass of cold milk These are perfect for birthday breakfasts special brunches or afternoon treats with friends You can also top them with toasted pecans or a dusting of cinnamon sugar
Common Recipe Questions
- → How do I get the perfect fluffy texture for honey buns?
Let the dough rise until doubled and avoid over-mixing. Rolling and shaping gently keeps the buns light and soft.
- → Can I bake these instead of frying?
Yes. Place the shaped buns on a baking tray and bake at 350°F (175°C) for 15–18 minutes until golden and cooked through.
- → What’s the best way to apply the glaze?
Dip the warm honey buns directly into the glaze or drizzle with a spoon for even, glossy coverage.
- → Can I substitute honey with another sweetener?
Maple syrup makes a delicious alternative in the glaze, adding a subtle flavor twist.
- → How should I store leftover honey buns?
Keep cooled buns in an airtight container at room temperature for up to two days, or freeze to enjoy later.
- → Is there a way to make these dairy-free?
Replace the milk and butter with plant-based alternatives, checking flavor and consistency before using.