 Save to Pinterest
 My kitchen smelled like a chocolate factory the morning I invented these, all because my niece mentioned feeling left out of St. Patrick's Day desserts. I had marshmallows, chocolate chips, and brownie batter on hand, and suddenly the image of a tiny edible leprechaun hat popped into my head. The first batch came together messier than I planned—chocolate everywhere, green icing dripping down my sleeve—but watching her face light up made every sticky finger worth it.
I made three batches for a St. Patrick's Day potluck where I honestly expected them to disappear into the crowd. Instead, a guy named Marcus asked for the recipe because his kids apparently fought over the last one, and that's when I realized this wasn't just a cute dessert—it was the kind of thing people actually remember eating.
Ingredients
- Unsalted butter (1/2 cup melted): Use room temperature before melting so it combines smoothly with the sugar; this makes the batter texture perfectly fudgy instead of cakey.
- Granulated sugar (1 cup): Don't skimp here—it's what gives these their signature richness and slight crackle on top.
- Large eggs (2): Room temperature eggs mix better and create a silkier batter, so pull them out while you're preheating the oven.
- Vanilla extract (1 tsp): Pure vanilla makes a noticeable difference in flavor depth; the imitation version works but tastes a bit flat by comparison.
- Unsweetened cocoa powder (1/3 cup): Sift this to avoid lumps that'll stay in your brownies—trust me, a few seconds with a sifter saves frustration later.
- All-purpose flour (1/2 cup): Measure by spooning and leveling, not by scooping straight from the bag, or you'll end up with too much and dense bites.
- Salt and baking powder (1/4 tsp each): These are small amounts but essential; they lift the brownie and balance the chocolate so it doesn't feel overwhelming.
- Large marshmallows (24): Fresh ones work best—stale marshmallows crack when you dip them in chocolate and lose that spongy appeal.
- Dark or semisweet chocolate chips (1 cup): Choose a brand you'd actually eat on its own, since the chocolate coating is the star here.
- Chocolate wafer cookies (24): These form the brim of the hat; thinner cookies bend slightly under pressure, which actually helps them sit naturally on top of marshmallows.
- Green icing: Homemade royal icing gives you more control and tastes fresher, but store-bought works perfectly fine if you're short on time.
- Gold sprinkles or edible glitter: Optional but they're the buckle that makes it unmistakably a leprechaun hat—worth the two dollars for the magic they add.
Tired of Takeout? 🥡
Get 10 meals you can make faster than delivery arrives. Seriously.
One email. No spam. Unsubscribe anytime.
Instructions
- Set your oven and prep:
- Preheat to 350°F and grease your mini muffin pan well or line it with liners so the brownies pop out easily once cooled. Cold chocolate sticks more than warm, so this step matters.
- Mix the wet ingredients:
- Whisk melted butter and sugar together until they look almost sandy, then add eggs and vanilla and beat until the mixture turns pale and fluffy. This usually takes a minute or two of whisking—don't skip it, as this aeration helps the brownies stay fudgy.
- Combine dry ingredients carefully:
- Sift cocoa powder, flour, salt, and baking powder together, then fold everything into the wet mix until just combined. Overmixing develops gluten and makes brownies tough, so stop as soon as you don't see dry streaks.
- Fill and bake:
- Spoon batter into each mini cup about two-thirds full, then bake for 12 to 15 minutes until a toothpick comes out mostly clean with a few moist crumbs still clinging. They'll continue to cook slightly as they cool, so don't overbake.
- Melt chocolate for dipping:
- Combine chocolate chips and butter in a microwave-safe bowl and heat in 30-second bursts, stirring between each one, until completely smooth. If you add chocolate in one big burst, it seizes up and becomes grainy.
- Dip marshmallows into chocolate:
- Insert a toothpick into each marshmallow and dip it fully into the melted chocolate, letting excess drip off for a few seconds so your coating isn't too thick. The chocolate should set in a thin, smooth layer.
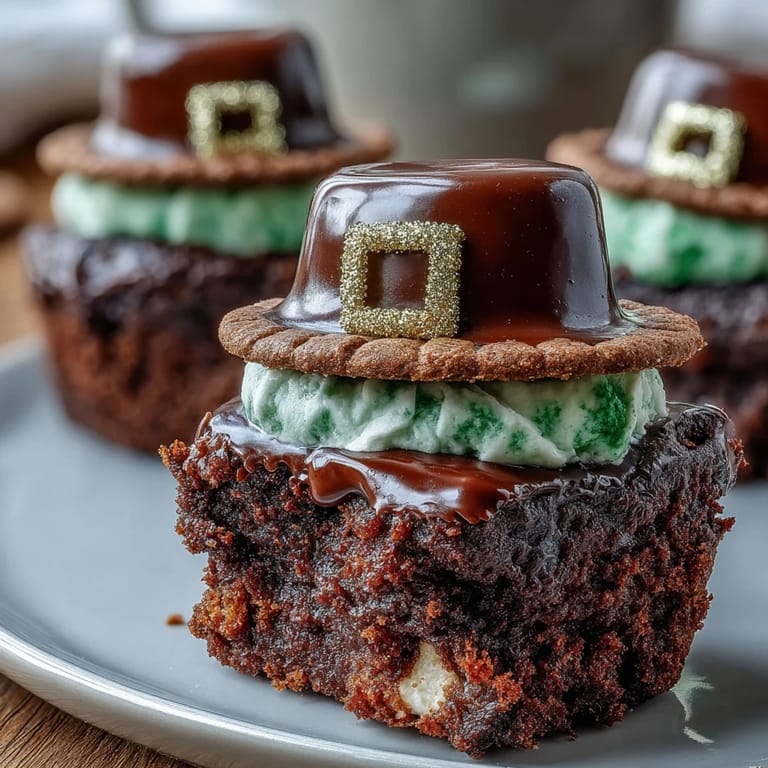
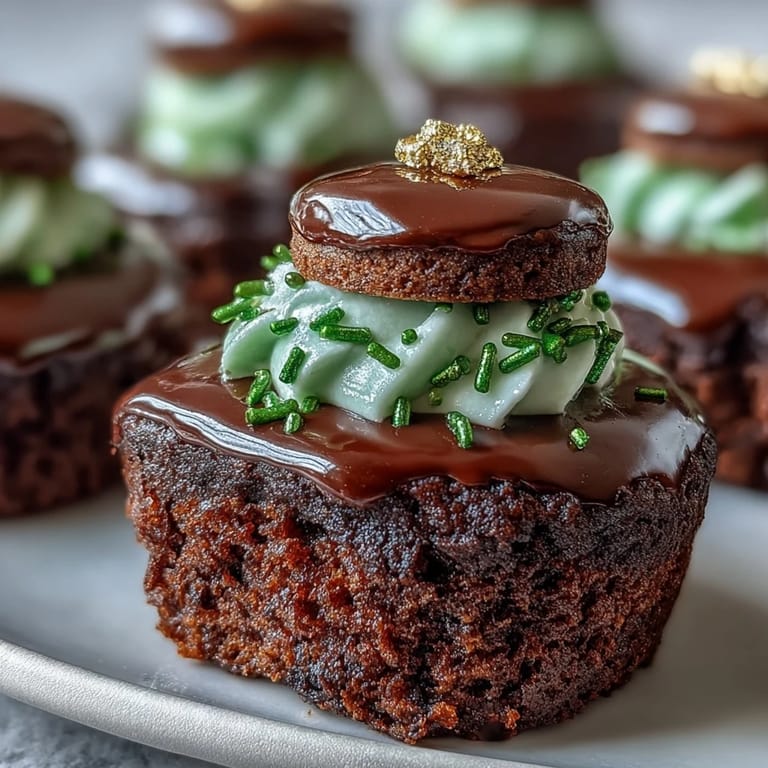
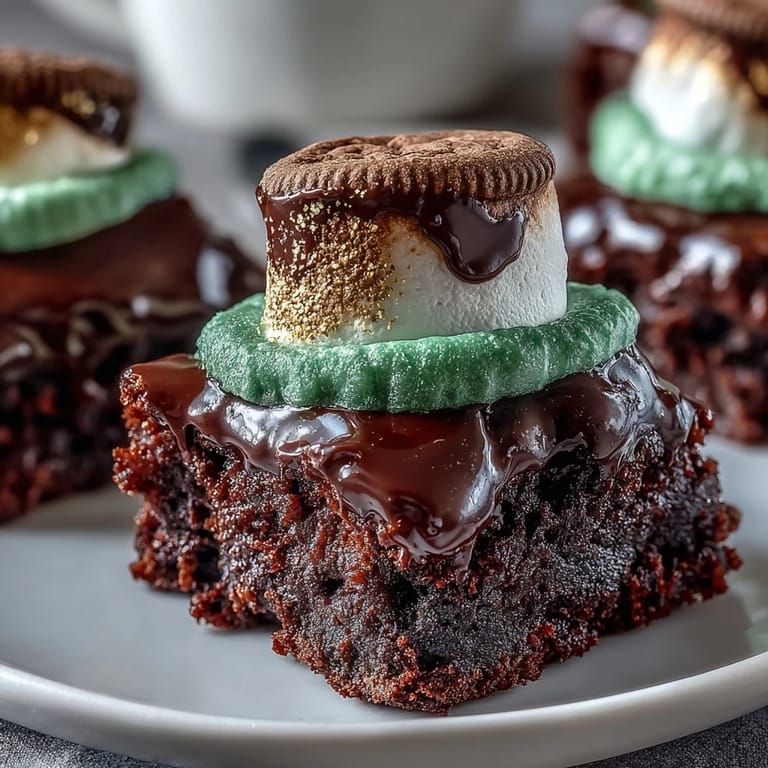
- Create the hat base:
- Place each chocolate-dipped marshmallow directly on top of a chocolate wafer cookie—this is your leprechaun hat brim. Let the chocolate firm up completely before moving forward, which takes about five minutes.
- Add the green band:
- Using a piping bag or even a small zip-top bag with the corner snipped, pipe a band of green icing around the base of the marshmallow where it meets the cookie. This is your hatband and should be thick enough to look intentional but not so thick it looks sloppy.
- Add the gold buckle:
- Sprinkle gold sprinkles or edible glitter onto the green icing to create a tiny buckle, which instantly makes it recognizable as a leprechaun hat. This small touch is what transforms it from a cute marshmallow-topped cookie into something clearly themed.
- Assemble the final bite:
- Once the chocolate on the marshmallow and the icing on the hatband are both firm, carefully remove each brownie from the pan and press the leprechaun hat onto the top, pushing gently so it adheres. Remove the toothpick slowly and carefully—if it sticks, wiggle it gently.
 Save to Pinterest
 One afternoon while decorating these with my sister, she told me they reminded her of the bad plastic leprechaun hats we wore as kids, and somehow that made these taste even better. Food tastes different when you're laughing in the kitchen with someone you love.
Why the Mini Size Matters
Brownie bites hit differently than full-sized brownies—they're portion-controlled so people can actually eat one without feeling guilty, plus the ratio of fudgy brownie to marshmallow hat to crispy cookie is perfectly balanced. Each bite gives you all three textures, which is exactly why they disappear so quickly.
Timing Your Prep and Assembly
Baking and cooling takes about 30 minutes, then assembly itself goes faster than you'd expect, usually 10 to 15 minutes if everything is prepped. If you make the brownies a day ahead and store them in an airtight container, assembly becomes a quick final step on party day, which takes stress out of the equation.
Customizing for Your Kitchen
These are naturally forgiving—if you don't have gold sprinkles, green nonpareils or even tiny cinnamon candies look cute as the buckle. The green icing is flexible too; homemade royal icing looks fancier, but thinned-down green food coloring mixed into buttercream works just as well and tastes better.
- Royal icing sets hard and stays crisp, while buttercream-based icing stays slightly soft and creamy between your teeth.
- If you're making these gluten-free, use a one-to-one baking flour blend and gluten-free wafer cookies in place of the originals.
- Store finished bites in an airtight container in a cool spot for up to three days, or freeze the brownie bites alone before decorating if you want to spread the project across two days.
 Save to Pinterest
 These little hats turned a simple potluck into something memorable, and they proved that sometimes the most impressive desserts come from happy accidents in the kitchen. Make them, watch people smile, and enjoy the smallness of making something thoughtful with your own hands.
Common Recipe Questions
- → What type of chocolate works best for coating marshmallows?
Dark or semisweet chocolate chips melt smoothly and provide a rich flavor that complements the marshmallows well.
- → Can I prepare these brownie bites ahead of time?
Yes, they can be stored in an airtight container for up to three days, maintaining their texture and freshness.
- → Are there alternatives to the green icing for decorating?
Colored fondant can be used instead of green icing for a different texture and appearance on the marshmallow hat band.
- → Can these brownie bites be made gluten-free?
Substitute the all-purpose flour and chocolate wafer cookies with gluten-free versions to accommodate dietary needs.
- → What is the best way to prevent marshmallows from melting during preparation?
Dip marshmallows briefly into melted chocolate and allow excess to drip off, ensuring they retain their shape without melting.