 Save to Pinterest
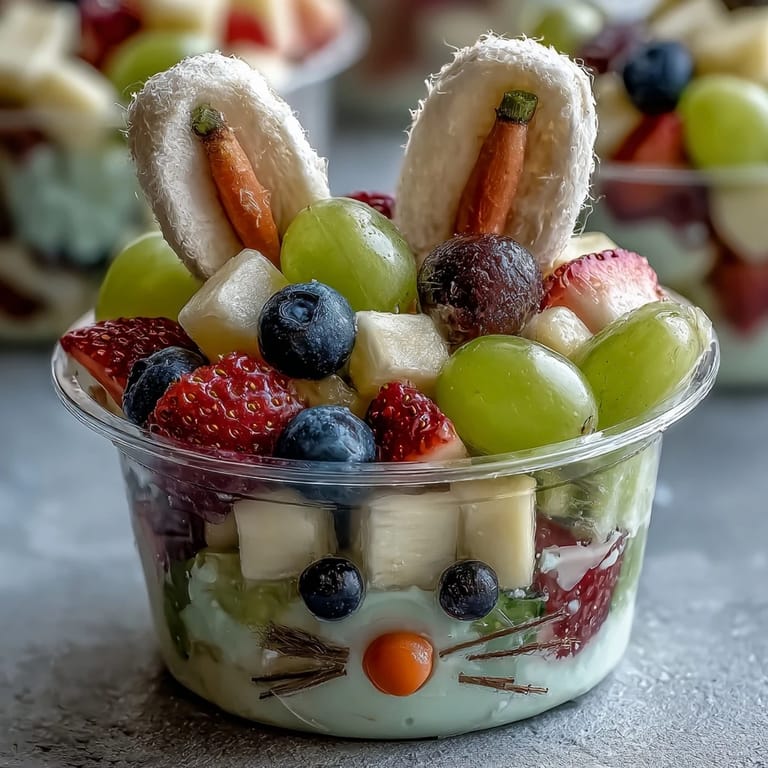
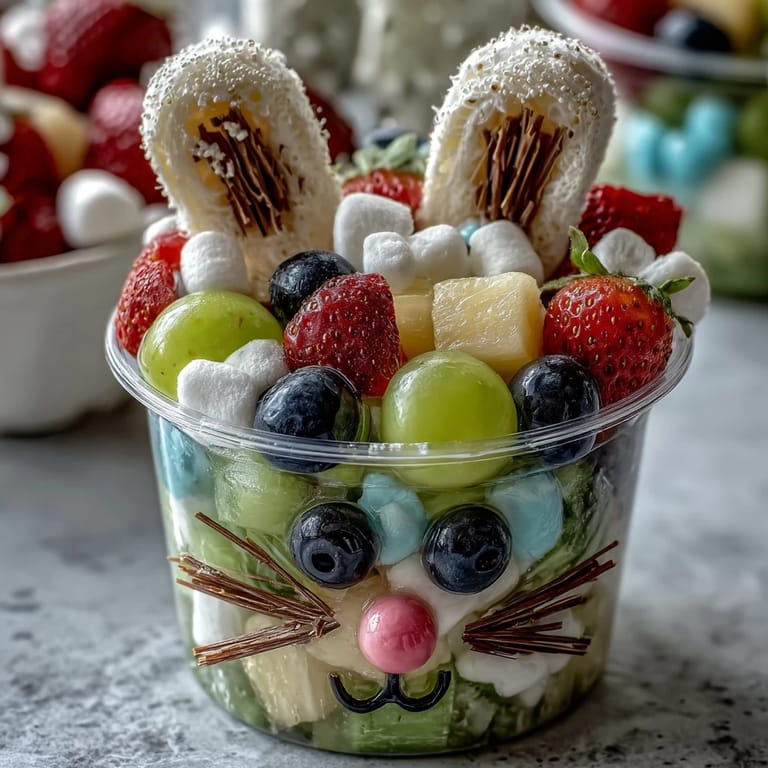
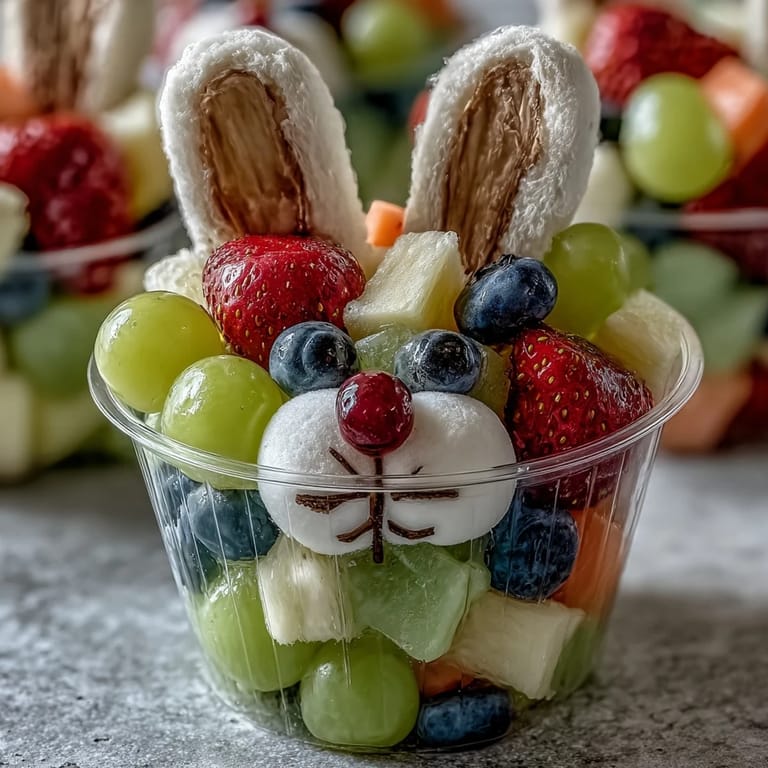
 My daughter came home from school with a craft project assignment that somehow turned into a kitchen adventure. She'd drawn this wobbly bunny with enormous ears, and when I asked what it was for, she said, 'Can we make it edible, Mom?' That's how Bunny Fruit Cups became our Friday afternoon project—half snack prep, half art class, completely chaotic in the best way. Now every Easter season, she insists on making them again, and I've learned that the real magic isn't in perfectly placed marshmallows, it's in the mess and laughter that happens while you're building them.
I made these for my nephew's Easter party last spring, and watching a room full of six-year-olds gasp when they saw the bunny cups made my heart do a little flip. One kid asked if he could keep his bunny as a pet before eating it, and that's when I knew we'd created something special—it's the kind of snack that bridges the gap between 'I'm so hungry' and 'this is actually fun.' Since then, I've made them for birthday parties, school events, and even just Tuesday afternoons when the kids needed a mood boost.
Ingredients
- Strawberries: Hull them fresh and dice small so they nestle naturally into the cups without making the bottom soggy—those tiny pieces also look cuter between the grapes.
- Green grapes: Halving them helps them distribute evenly throughout the cup and makes it easier for little hands to grab.
- Blueberries: These stay firm longer than softer fruits, so they're your structural heroes in the bottom layers.
- Pineapple: Fresh is always better than canned here because it holds its shape and adds brightness, plus kids love how it tastes completely different from the other fruits.
- Large marshmallows: These are your bunny cheeks, and honestly, the bigger they are, the cuter the whole thing looks—they're also sturdy enough to hold the face together.
- Mini marshmallows: Perfect nose-sized and they add that second layer of softness that makes biting into the face fun rather than tough.
- Candy eyes: Get the edible ones if you can find them, but regular cake decorating eyes work too—just tell kids not to swallow them.
- Pink jellybeans or candies: These become the actual nose and add a pop of color that makes the whole bunny face pop against the white marshmallows.
- Paper cupcake liners: White ones are classic, but I've used pastel colors too—they're surprisingly sturdy when folded properly for ears.
- Black edible marker: This is what brings the personality out; don't be shy with the whiskers and mouth because bland bunnies are sad bunnies.
- Banana and kiwi: Optional additions that add tropical flavor and visual contrast if you want extra fruity goodness.
Tired of Takeout? 🥡
Get 10 meals you can make faster than delivery arrives. Seriously.
One email. No spam. Unsubscribe anytime.
Instructions
- Prep your fruit lineup:
- Wash everything thoroughly, then cut each fruit type into small, bite-sized pieces—this isn't the time for big chunks because they won't look elegant and they're harder for kids to enjoy. Keep each fruit in its own small bowl so you can see what you're working with and grab colors easily as you fill the cups.
- Build the fruity base:
- Toss all your prepped fruit together in one large bowl to mix the colors naturally, then divide evenly among your six cups, filling them about two-thirds of the way full. This leaves room at the top for the bunny face without fruit spilling everywhere when you add the marshmallow features.
- Create the bunny face foundation:
- Take two large marshmallows and press them gently into the fruit in each cup so they sit side by side like chubby cheeks. Press them down just enough that they nestle into the fruit and feel stable, but not so hard that they squish into weird shapes.
- Add the nose and eyes:
- Place a mini marshmallow or pink candy right between the two cheek marshmallows as a nose, then use a tiny dab of honey or a microscopic amount of icing to glue the candy eyes just above where the cheeks are. The honey works beautifully because it's sticky but doesn't taste weird, and it dries quickly without making things soggy.
- Draw on personality:
- Using your black edible marker, draw three or four little whiskers on each cheek marshmallow, then add a small curved line below the nose for a smile—this is where the bunny goes from cute to absolutely adorable. Don't overthink it; wobbly lines are charming and way more character-filled than perfect ones.
- Engineer the ears:
- Take each white paper cupcake liner and fold it in half, then cut out ear shapes from the folded edge so when you unfold them, you have two connected ears. Tape or glue the folded edge to the inside rim at the back of each cup so the ears stick straight up and out—they should look a little floppy, which honestly makes them cuter.
- Finish and serve:
- Step back and admire your little fruit bunny army, then serve immediately or refrigerate for up to four hours if you need to prep ahead. If refrigerating, keep them uncovered so the marshmallows don't get sweaty and weird from condensation.
 Save to Pinterest
 There was this moment during my nephew's Easter party when he bit into his bunny cup and his eyes went wide because he wasn't expecting that burst of fresh pineapple and the marshmallow to work together. That's when I realized these aren't just pretty snacks—they're little edible surprises that make eating fruit feel like an adventure. It's become my go-to gift for families with young kids because it checks every box: it's festive, it's healthy-ish, it's Instagram-worthy without being complicated, and most importantly, it makes kids genuinely excited about what they're eating.
Fruit Swap Ideas That Actually Work
I've experimented with different fruit combinations based on what's in season or what the kids claim to like that week. Raspberries work beautifully for color but get mushy faster, so add them last minute. Mandarin orange segments are sweeter and brighter than you'd expect, and they nestle perfectly between the grapes. I once tried dried cranberries in the mix thinking it would add texture, and honestly, they were kind of weird because they chewy instead of crisp—fresh fruit is definitely your best bet here. Watermelon chunks are fun too, though they release more liquid, so use them sparingly and serve these sooner rather than later if you go that route.
Making Them Dairy-Free and Allergy-Safe
If you're working with allergies or dietary restrictions, the fruit part is naturally friendly to almost everything—it's the decorative stuff that needs attention. Marshmallows traditionally contain gelatin, so swap them for vegan marshmallows, which honestly hold their shape better when you're pressing them into fruit anyway. For the candies, check every label because some pink jellybeans and decorative candies sneak in gluten or dairy without you realizing it.
Presentation Secrets and Party Tips
I learned the hard way that these look most impressive when you serve them cold, straight from the fridge, because the fruit is crisp and the marshmallows are a little firmer and less likely to slide around. If you're making these ahead for an event, assemble everything except the ears the night before and store them covered in the fridge, then add the ears about an hour before serving so they stay perky. The marker details are what make them feel special and less like someone just threw stuff in a cup, so take an extra thirty seconds per bunny to add whiskers, eyes, and expression—it's the difference between 'cute' and 'I'm-going-to-remember-this-forever.'
- Serve these with lemonade or punch to make it feel extra festive, and honestly, the slightly sweet beverage pairs perfectly with the fruit and marshmallow combo.
- If you're making multiple batches for different kids, let them choose their own fruit combinations and then decorate their own faces—it turns snack prep into craft time and everyone's excited about eating something they made.
- Keep the edible marker away from warm fruit or it will blur everywhere, so do all your drawing right before serving when everything is cool and slightly firm.
 Save to Pinterest
 These bunny cups have become my secret weapon for making healthy eating feel like celebration instead of obligation, and watching a kid's face light up when they see their own creation is worth every minute of prep. Make these with someone you love, and somehow the snack becomes less about the fruit and more about the memory.
Common Recipe Questions
- → How do I prepare the fruit for the cups?
Wash all fruit thoroughly. Hull and dice strawberries, halve grapes, dice pineapple, and optionally include diced kiwi or sliced banana for extra flavor.
- → What materials are used to create the bunny ears?
White paper cupcake liners are folded and cut into ear shapes, then attached to the inside rim at the back of each cup using tape or glue.
- → Can this snack be made dairy-free?
Yes. To accommodate dairy-free needs, simply omit marshmallows or use vegan marshmallow alternatives for the cheeks and noses.
- → How do I make the bunny faces on the cups?
Place two large marshmallows on the front as cheeks, add a mini marshmallow or pink candy for the nose, stick candy eyes above, and draw whiskers and mouth with an edible marker.
- → How long can these fruit cups be stored before serving?
They can be refrigerated for up to 4 hours before serving to keep the fruit fresh and decorations intact.