 Save to Pinterest
 Chewy and wholesome granola bars come together with just a handful of kitchen staples for a snack or breakfast that feels both nourishing and effortless. These bars require no oven time and can be endlessly personalized to fit your mood or pantry. My kids love building their own custom batches for school mornings and after-dinner treats.
I started making these bars when my family’s snack cravings soared during summer break and now they disappear almost faster than I can chill them.
Ingredients
- Rolled oats: the heart of the bars choose thick, old-fashioned oats for maximum chewiness and be sure to use certified gluten free oats if needed
- Nut butter: adds richness and binds everything together look for creamy varieties without added sugar or hydrogenated oils
- Honey: brings natural sweetness and helps hold the bars together swap for maple syrup to make them vegan
- Vanilla extract: deepens the flavor a good quality real extract makes a difference
- Salt: balances sweetness and enhances all the flavors a fine sea salt mixes in best
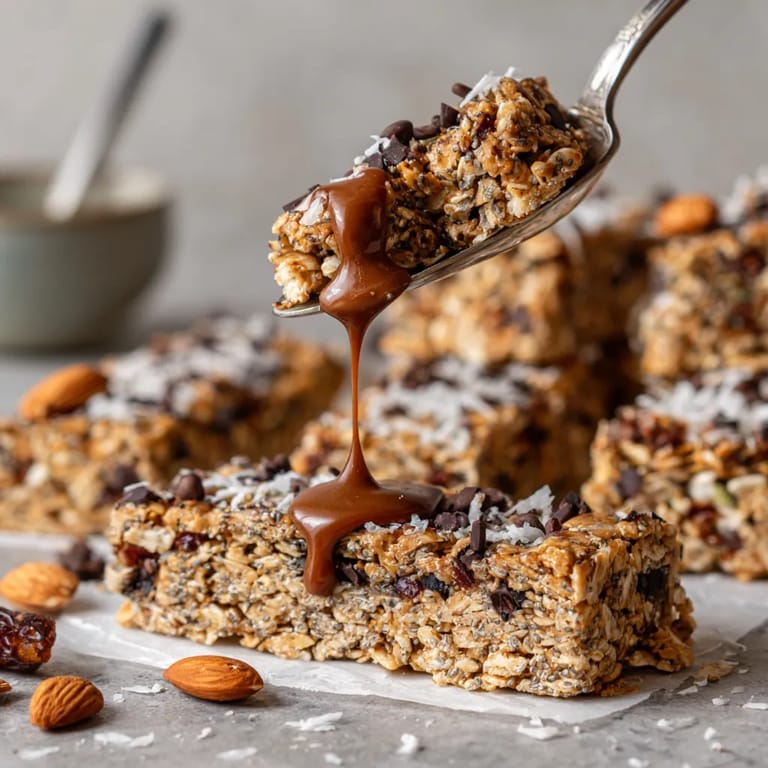
- Mini chocolate chips: make every bite a treat use dark, milk, or dairy free to fit your taste
- Chopped nuts: for crunch and a boost of healthy fats toast them lightly for extra flavor
- Dried fruit: adds chewy bursts of sweet and tart buy unsweetened and chop if large
- Shredded coconut: a subtle tropical note opt for unsweetened
- Chia seeds or flaxseed: provide extra fiber and healthy omega threes sprinkle in for a nutrition boost
Tired of Takeout? 🥡
Get 10 meals you can make faster than delivery arrives. Seriously.
One email. No spam. Unsubscribe anytime.
Step-by-Step Instructions
- Prep the Pan:
- Line an 8 inch square baking pan with parchment paper making sure to leave extra hanging over the sides to help you lift the bars out later
- Combine the Dry Base:
- Add oats and salt to a large mixing bowl stir well to distribute the salt evenly so every bite is perfectly seasoned
- Melt and Mix Wet Ingredients:
- In a microwave safe bowl combine nut butter and honey then warm for about thirty five seconds stir until smooth and creamy then blend in the vanilla extract for full flavor throughout the bars
- Mix Wet and Dry:
- Pour the warmed nut butter mixture over the bowl of oats use a sturdy spoon or spatula to mix thoroughly pressing down to ensure every bit of oat is coated and glossy
- Incorporate Mix Ins:
- Choose your favorite add ins and gently fold them in make sure to distribute everything evenly so each bar gets plenty of goodies
- Pack the Pan Tightly:
- Scrape the mixture into the prepared pan spread it out then pack it down as firmly as possible use the back of a measuring cup or a pastry roller to press until the top is flat and compact for bars that hold together well
- Chill Until Firm:
- Refrigerate the pan for at least one hour this helps the oats absorb flavor and the bars to set so they are easy to slice
- Slice and Serve:
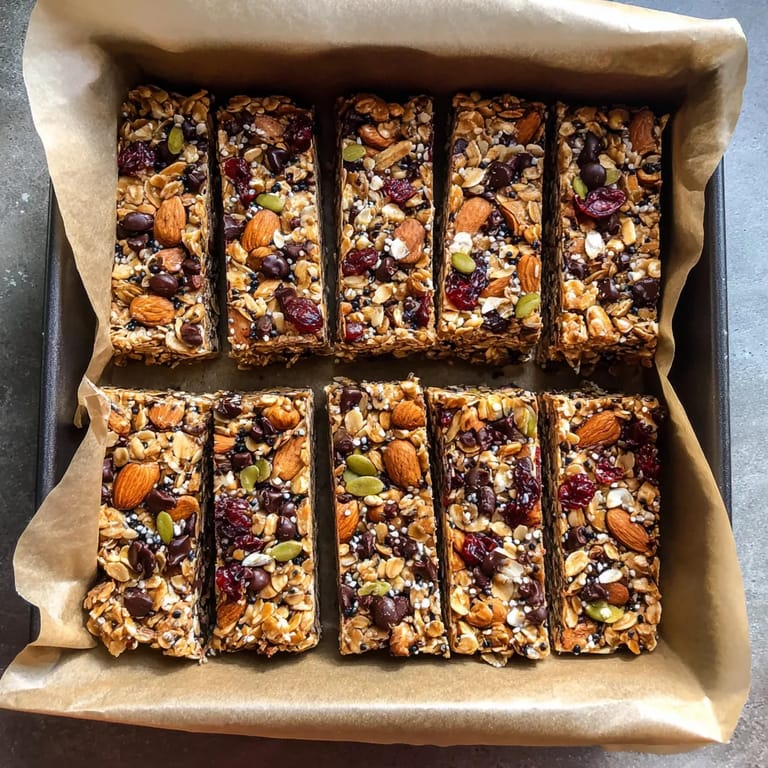
- Use the parchment to lift chilled bars out of the pan place on a cutting board and slice into twelve even portions a sharp knife works best for nice clean edges
- Store for Later:
- Transfer bars to an airtight container and refrigerate they will stay fresh and chewy for up to one week
 Save to Pinterest
 There is something nostalgic about the combination of oats and chocolate chips in these bars my youngest once declared them better than any store bought granola bar and now requests a double batch for every road trip
Storage Tips
Once sliced layer the bars with parchment paper in a container and keep them refrigerated airtight containers help the bars stay chewy and prevent them from absorbing fridge odors If you want to keep them longer you can wrap each bar tightly and freeze for up to two months Just thaw in the fridge overnight before enjoying
Ingredient Substitutions
For a nut free version sunflower seed butter works beautifully instead of nut butter and pumpkin seeds or more coconut can step in for the chopped nuts To make them vegan always swap maple syrup for honey and pick dairy free chocolate chips For extra flavor try adding a sprinkle of cinnamon or even a swirl of cocoa powder
Serving Suggestions
These bars are perfect for tossing in a backpack or lunchbox They also make excellent fuel before or after a workout or as an afternoon snack with yogurt or an apple For a fancier touch drizzle with a little melted chocolate or serve with a cup of coffee or tea for breakfast on the go
Save to Pinterest Granola Bar Traditions
Granola bars like these have roots in the classic American love for homemade wholesome snacks Often inspired by camping trips and lunchbox nostalgia they bring everyone to the kitchen to stir and taste Since these are so customizable it is easy to turn making them into a family activity everyone chooses their own mix ins for a unique flavor each time
Common Recipe Questions
- → Can I make these bars vegan?
Yes, substitute honey with maple syrup and choose dairy-free mix-ins to create vegan-friendly bars.
- → How do I make the bars nut-free?
Swap out nut butter for sunflower seed or pumpkin seed butter, and avoid adding optional nuts to keep them nut-free.
- → How long do the bars stay fresh?
Store them in an airtight container in the refrigerator for up to one week for best freshness and texture.
- → Can I use different mix-ins?
Absolutely! Customize with your favorite chocolate chips, dried fruit, seeds, coconut, or chopped nuts up to 1 cup total.
- → Can I freeze the granola bars?
Yes, these bars freeze well. Wrap them individually and freeze for up to 2 months. Thaw at room temperature before eating.
- → Are these bars gluten-free?
The bars are gluten-free if you use certified gluten-free oats. Always check labels to ensure safety for dietary needs.