 Save to Pinterest
 My daughter came home from school one Tuesday buzzing about a bunny cake she'd seen in a picture book, and suddenly our Easter plans had a new centerpiece. I'll admit my first instinct was to order one from the bakery, but watching her eyes light up as she described the coconut fur made me realize this was one of those moments worth getting flour under my fingernails for. The beautiful part? It's easier to pull off than it looks, and the final reveal never fails to make kids (and adults) smile.
I made this bunny cake for my niece's Easter brunch last spring, and I watched her literally gasp when I carried it to the table. Her little brother immediately wanted to know if the jelly bean tail was magic, which somehow felt like the highest compliment. By the time everyone was eating it, the cake had become the story everyone kept retelling—not because it was fancy, but because it brought so much genuine joy to a simple Sunday morning.
Ingredients
- All-purpose flour: The foundation of a tender crumb that holds its shape when you're carving out bunny ears and paws.
- Baking powder and baking soda: Together they create a cake that's light without being too delicate to sculpt.
- Unsalted butter: Use softened butter so it creams into the sugar smoothly, which traps tiny air pockets and keeps the cake fluffy.
- Granulated sugar: The sweetness here is balanced so the frosting doesn't make the whole thing cloyingly sweet.
- Room temperature eggs: Cold eggs won't blend properly and you'll end up with a denser cake that's harder to work with.
- Whole milk: Creates a tender crumb and adds subtle richness without overwhelming the vanilla flavor.
- Unsalted butter for frosting: Keeps the frosting taste clean so the vanilla and sweetness come through.
- Powdered sugar: Sift it first or you'll spend forever beating out lumps and risk an uneven frosting.
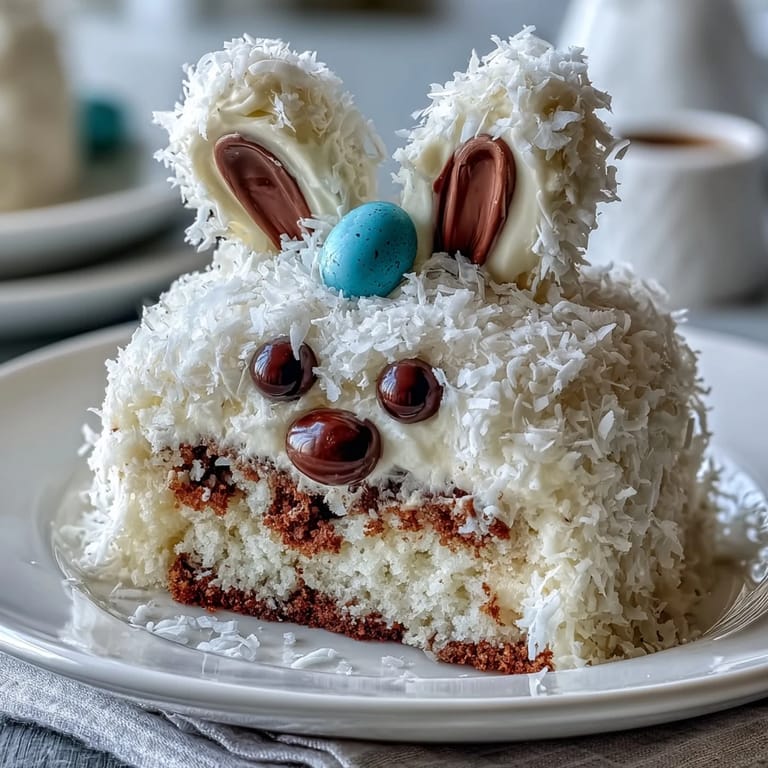
- Sweetened shredded coconut: This is your bunny's fur, so choose coconut that feels soft and fluffy, not hard or dried out.
- Jelly beans: Pick sturdy ones that won't roll off or get crushed when you're pressing them into frosting.
Tired of Takeout? 🥡
Get 10 meals you can make faster than delivery arrives. Seriously.
One email. No spam. Unsubscribe anytime.
Instructions
- Prep your pans and oven:
- Set the oven to 350°F and grease those cake pans well—I use a combination of butter and flour because it helps the cakes release cleanly. If you skip this step, you'll be fighting with a stuck cake and that ruins the whole sculpting plan.
- Mix your dry ingredients:
- Whisk together the flour, baking powder, baking soda, and salt in a medium bowl so everything's evenly distributed. This prevents dense pockets of baking soda that create weird metallic tastes.
- Cream the butter and sugar:
- Beat them together for a solid 2–3 minutes until the mixture is pale and fluffy—this is where you're building the structure of your cake. You'll know it's ready when it looks almost mousse-like and much lighter than when you started.
- Add the eggs one at a time:
- After each egg, beat it in fully before adding the next one, then add the vanilla. This ensures they're evenly distributed and your batter stays smooth and emulsified.
- Alternate wet and dry ingredients:
- Add a third of the flour mixture, then half the milk, then another third of flour, then the remaining milk, then the last of the flour. Always start and end with flour—it prevents the batter from breaking and keeps everything tender.
- Divide and bake:
- Split the batter evenly between pans and bake for 30–35 minutes until a toothpick comes out clean. Don't overbake or your cake will be dry and won't hold together when you're carving it.
- Cool with patience:
- Let the cakes sit in their pans for 10 minutes so they set slightly, then turn them out onto a wire rack. Trying to work with a still-warm cake is asking for a crumbled disaster.
- Make your frosting:
- Beat the softened butter until creamy, then gradually add powdered sugar so you don't create a powdery cloud in your kitchen. Add vanilla and milk until it's thick enough to hold a shape but soft enough to spread.
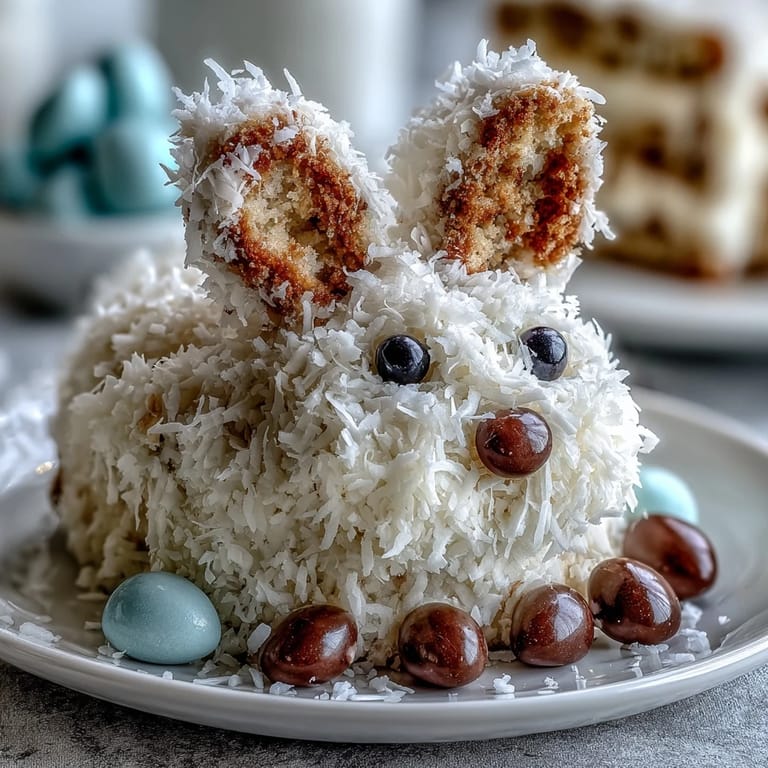
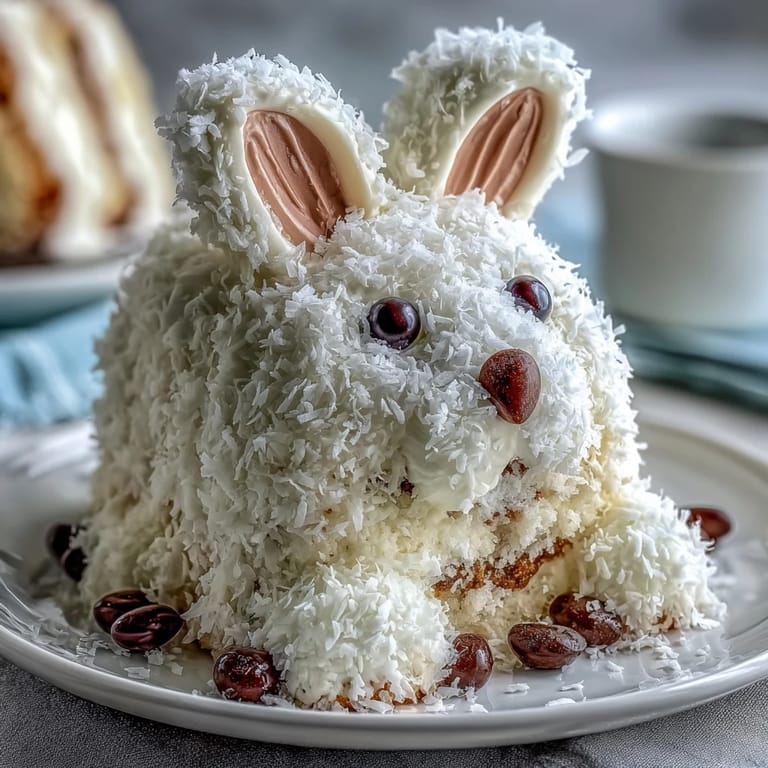
- Build the bunny body:
- Place one whole cake round on your serving platter as the body. Cut the second round in half and stand those semicircles upright at one end to form the back and head—use a dab of frosting like glue.
- Carve and attach:
- From the remaining cake scraps, cut out two ear shapes and two paw shapes using a serrated knife. Attach them with frosting, using more than you think you need to keep everything stable.
- Frost generously:
- Cover the entire bunny with a thick layer of frosting—this is your adhesive for the coconut and your canvas for decoration. Don't worry about perfection; bumps and swirls actually look more like fluffy fur.
- Apply the coconut fur:
- Press shredded coconut all over the frosting, using your fingers to really work it in. The cake should look like a fuzzy, adorable creature, not a carefully manicured poodle.
- Add the finishing touches:
- Place the pink jelly bean at the back for the tail, white jelly beans with pink pads on the paws, and chocolate chips or black jelly beans for eyes. If you want, tint some coconut pink with food coloring and sprinkle it on the ears for extra personality.
- Chill before serving:
- Refrigerate until you're ready to bring it to the table so the frosting sets and everything stays firmly in place.
 Save to Pinterest
 There's something unexpectedly moving about a silly cake that makes everyone at the table feel like kids again. My mom, who's usually all business about dessert, caught herself grinning at the jelly bean eyes, and suddenly we were all laughing about the bunny's lopsided expression.
Flavor Variations to Try
The vanilla base is flexible, so don't be afraid to experiment with extracts. I've added almond extract for a subtle nuttiness that pairs beautifully with the coconut, and once I used a touch of lemon which felt fresh and springy. Even a small change like this can make the cake feel uniquely yours without complicating the decorating process.
Shortcuts That Actually Work
Some traditions are worth the from-scratch effort, but this bunny cake is not precious about it. A high-quality store-bought cake mix and canned frosting will get you most of the way there, and honestly nobody's going to taste the difference once you've covered it in coconut and jelly beans. What matters is that you made the effort to create something special, even if part of that effort was outsourcing the basics.
Making It Memorable
This cake works best when it becomes part of a moment rather than just a dessert. Set it out as a surprise, let people gather around before you cut into it, or use it as a centerpiece that stays on the table while you eat. The decoration takes work, but the memory it creates—that's the real payoff.
- If you're making this for kids, let them help with the jelly bean placement even if it means the bunny looks gloriously chaotic.
- Pair it with cold milk or herbal tea so the sweetness doesn't overwhelm; the simplicity of the pairing keeps the whole meal feel nostalgic and warm.
- Save a slice in a small container because cold cake is surprisingly good the next morning if anyone raids the fridge.
 Save to Pinterest
 Making a bunny cake teaches you something valuable about cooking: sometimes the recipe is just an excuse to create something that brings people together. The cake itself is delicious, but what really sticks is that moment when someone you care about smiles at something you made with your own two hands.
Common Recipe Questions
- → How is the bunny shape achieved?
The shape is created by using two round cake layers with one cut into halves and assembled to form the body, head, ears, and paws.
- → What gives the coconut its fluffy texture?
Sweetened shredded coconut is pressed onto the frosted cake to create a soft, fur-like appearance.
- → Can I use alternatives for the jelly bean decorations?
Yes, mini chocolate chips or similar small candies can replace jelly beans for details like eyes and paw pads.
- → Is there a way to speed up the preparation?
Using store-bought cake mix and frosting offers a quicker alternative without sacrificing much flavor or appearance.
- → How can I add extra flavor to the cake batter?
Adding lemon or almond extract enhances the flavor profile subtly and pairs well with the decorations.