 Save to Pinterest
 The first time I made pea pesto, I was honestly just trying to use up a bag of frozen peas from the back of my freezer. But that electric green paste changed everything I thought I knew about grilled cheese. It was a rainy Tuesday afternoon, nothing special about the day, until I took that first bite and realized how something so simple could taste so alive and springlike.
I served these sandwiches to my sister last spring when she was feeling overwhelmed with work. We sat at the kitchen table, steam rising from our plates, and she actually stopped texting long enough to say that this was exactly what she needed. Sometimes food just hits different when someone makes it for you.
Ingredients
- Fresh or thawed frozen peas: These become the base of your pesto and bring natural sweetness that balances the savory elements
- Fresh basil leaves: Half a cup gives you that classic pesto flavor without overwhelming the delicate pea taste
- Small garlic clove: One is plenty since this pesto stays raw and gentle
- Grated Parmesan cheese: Adds umami depth that makes the pesto taste properly rich
- Toasted pine nuts: Walnuts work beautifully too and are more budget friendly
- Extra virgin olive oil: Two tablespoons helps everything blend into a cohesive sauce
- Lemon zest and juice: This brightens the whole pesto and keeps it from feeling heavy
- Salt and pepper: Essential for bringing all the flavors together
- Sourdough bread: Four sturdy slices that will hold up to grilling and all that pesto
- Unsalted butter: Softened butter spreads easily and helps achieve that golden crust
- Shredded mozzarella cheese: One cup melts beautifully and has a mild flavor that lets the pesto shine
- Baby arugula or spinach: Optional but adds a fresh peppery bite and some texture
Tired of Takeout? 🥡
Get 10 meals you can make faster than delivery arrives. Seriously.
One email. No spam. Unsubscribe anytime.
Instructions
- Blend the pesto base:
- Combine your peas, basil, garlic, Parmesan, pine nuts, olive oil, lemon zest, lemon juice, salt, and pepper in a food processor. Pulse until mostly smooth but still slightly textured, about 30 to 45 seconds. Taste and add more salt or lemon juice if it needs brightness.
- Prep your bread:
- Spread a thin layer of softened butter on one side of each bread slice, making sure to cover all the way to the edges. This prevents burning and ensures even browning.
- Build the sandwiches:
- Place two slices buttered side down on your work surface. Spread two tablespoons of that gorgeous green pesto on each slice, then top with an even layer of mozzarella. Add a handful of arugula if you are using it and crown with the remaining bread slices, buttered side up.
- Grill to perfection:
- Heat a skillet or griddle over medium heat for a couple of minutes. Place sandwiches in the pan and cook for 3 to 4 minutes per side, pressing gently with your spatula, until the bread is deeply golden and the cheese is completely melted.
- Enjoy immediately:
- Let the sandwiches rest for just 60 seconds before slicing them in half on the diagonal. Serve while still warm and watch the cheese stretch when you take that first bite.
 Save to Pinterest
 Last month I made a double batch of the pesto and kept it in a jar in the refrigerator. My husband started putting it on everything from scrambled eggs to roasted vegetables, and honestly, he was onto something. Now I always make extra because this pesto has become a staple in our kitchen rotation.
Making It Your Own
Sometimes I swap in mint leaves for half the basil when I want an even fresher, more springlike vibe. The combination of peas and mint is surprisingly sophisticated and reminds me of gardens in May. You can also add a handful of fresh spinach to the pesto for extra nutrients without changing the flavor much.
The Perfect Pairings
I have found that a simple side salad with vinaigrette helps cut through the richness of the cheese. A cup of tomato soup, obviously, but try roasting the tomatoes first for deeper flavor. In summer, some sliced cucumbers with a sprinkle of salt balance everything beautifully.
Storage and Make Ahead Tips
The pesto keeps brilliantly in the refrigerator for up to five days, stored in an airtight container with a thin layer of olive oil on top to prevent oxidation. You can also freeze it in ice cube trays and then transfer to a freezer bag for those nights when you need something quick and comforting.
- Press the sandwiches gently in the pan but do not go too heavy or the pesto might squeeze out
- If your bread is very thick, lower the heat and cook a bit longer to ensure the cheese melts completely
- A cast iron skillet gives the best crust but any heavy pan will work perfectly fine
 Save to Pinterest
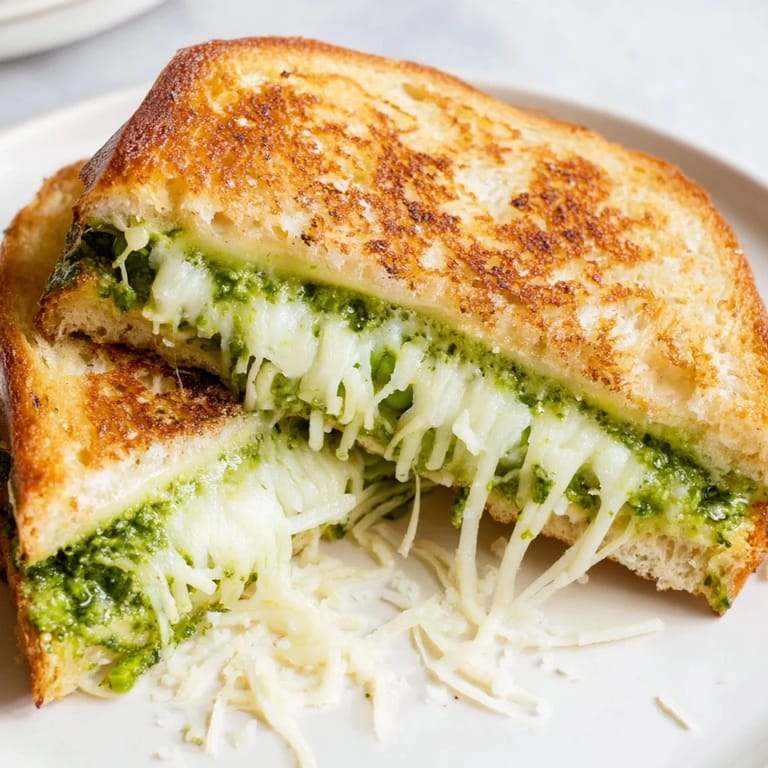
 There is something so satisfying about cutting into a grilled cheese and seeing that vibrant green pesto peeking through the layers. Hope this brings a little brightness to your kitchen too.
Common Recipe Questions
- → Can I use frozen peas instead of fresh?
Yes, thawed frozen peas work well and retain their sweetness when blended into the pesto.
- → What kind of nuts are best for the pesto?
Toasted pine nuts offer a traditional flavor, but walnuts can add a rich, nutty variation.
- → How do I prevent the bread from burning while grilling?
Use medium heat and cook each side gently for 3-4 minutes, pressing lightly to melt the cheese without burning the bread.
- → Can I substitute mozzarella for another cheese?
Fresh mozzarella works best for meltiness, but mild provolone or fontina can be good alternatives.
- → Is there a way to make the pesto nut-free?
Yes, replace pine nuts with sunflower seeds for a nut-free version without compromising texture.