Save to Pinterest
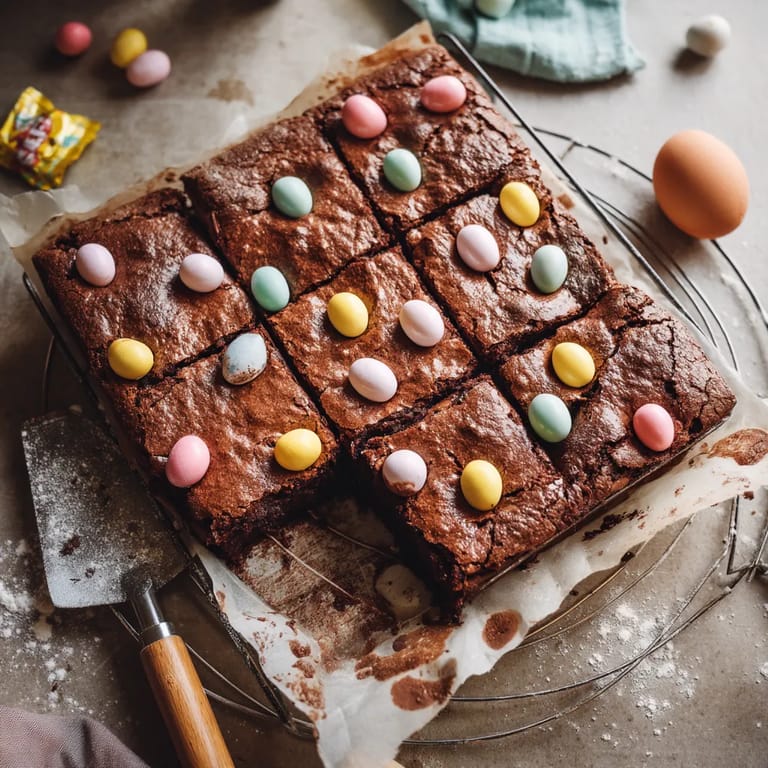
 These fudgy Easter brownies are what celebration desserts should be - indulgent, festive, and deceptively simple to make. The pastel Cadbury Mini Eggs create a stunning contrast against the dark chocolate backdrop, making these treats as beautiful as they are delicious.
I first made these for my niece's Easter egg hunt three years ago, and they've become our family's most requested spring tradition. Even my brother, who claims not to have a sweet tooth, sneaks an extra brownie when he thinks nobody's watching.
Ingredients
- Unsalted butter creates a rich, tender crumb and lets the chocolate flavor shine
- Semisweet chocolate bar provides better melting and flavor than chocolate chips
- Combination of white and brown sugars balances sweetness while keeping brownies moist
- Room temperature eggs incorporate better for that perfect fudgy texture
- Pure vanilla extract enhances the chocolate notes
- Unsweetened cocoa powder intensifies the chocolate flavor without extra sweetness
- All purpose flour gives structure while keeping brownies dense rather than cakey
- Salt balances the sweetness and enhances chocolate flavor
- Cadbury Mini Eggs offer a seasonal festive touch with their candy shell and milk chocolate center
Tired of Takeout? 🥡
Get 10 meals you can make faster than delivery arrives. Seriously.
One email. No spam. Unsubscribe anytime.
Step-by-Step Instructions
- Prepare the Pan
- Line your 8x8 pan with parchment paper, leaving overhang on two sides. This creates handles for easy removal. Spray lightly with baking spray even under the parchment for insurance against sticking.
- Melt Chocolate and Butter
- Use gentle heat when melting these ingredients together. The microwave works well in short bursts, but watch carefully. Overheating chocolate can make it seize and turn grainy. Stir between each 30 second interval until smooth and glossy.
- Create the Base
- Whisking in both sugars while the chocolate mixture is still warm helps them dissolve completely. The mixture may look slightly grainy at first but will smooth out. Continue whisking for about a minute to ensure everything is well incorporated.
- Add the Eggs
- Make sure your eggs are truly at room temperature for best incorporation. Cold eggs can cause the chocolate to harden prematurely. Whisk vigorously for about 45 seconds until the batter becomes notably shinier and slightly thicker.
- Incorporate Dry Ingredients
- Switch to a spatula for this step to avoid overmixing. Fold the cocoa, flour and salt in with gentle strokes, scraping the bottom of the bowl thoroughly. Stop mixing as soon as no dry streaks remain for the fudgiest texture.
- Add the Mini Eggs
- Fold in the Mini Eggs with just a few strokes. Their candy shells will maintain their colorful appearance even after baking, creating beautiful pops of color throughout the brownies.
- Top and Bake
- Chopping the remaining Mini Eggs for the top creates a more even distribution and makes the brownies easier to cut later. Bake in the middle rack of your oven for the most even heat distribution.
 Save to Pinterest
 The Mini Eggs are truly what make these brownies special to me. Their candy shells soften slightly during baking while maintaining their shape, creating pockets of milk chocolate that contrast beautifully with the deeper chocolate flavor of the brownies. My grandmother always says good baking is about textural contrast, and these deliver that perfectly.
The Secret to Fudgy Brownies
The key to achieving that perfect fudgy texture lies in the ratio of fat to flour. This recipe intentionally uses more butter and chocolate with minimal flour to create that dense, rich texture that distinguishes truly excellent brownies from cakey imposters. Another crucial factor is avoiding overmixing once the flour is added. Each stroke develops gluten which creates structure. For brownies, we want just enough structure to hold together but not so much that they become cake.
Storing Your Easter Brownies
These brownies actually taste better on day two when the flavors have had time to meld. Store them in an airtight container at room temperature for up to 4 days. For longer storage, wrap individual brownies tightly in plastic wrap then place in a freezer bag for up to 3 months. Thaw at room temperature for about an hour before serving. If you like warm brownies, microwave a thawed brownie for 10 to 15 seconds before enjoying.
Customizing Your Easter Brownies
While Mini Eggs are perfect for Easter, this versatile brownie base works with many mix ins. Try crushed Oreos for a cookies and cream version, or swap the Mini Eggs for chopped Reese's peanut butter cups. For a more sophisticated adult version, add 1 tablespoon of espresso powder to the batter and top with sea salt flakes instead of candy. During Christmas, crush candy canes for a festive peppermint version. The possibilities are endless once you master this reliable base recipe.
Save to Pinterest Common Recipe Questions
- → Can I use regular chocolate chips instead of Cadbury Mini Eggs?
Yes, you can substitute regular chocolate chips or chunks if Mini Eggs aren't available. However, the Mini Eggs provide both chocolate flavor and a colorful candy shell that makes these brownies festive for Easter. If substituting, consider using 3/4 cup of chocolate chips and perhaps adding 1-2 tablespoons of colorful sprinkles on top to maintain the festive appearance.
- → How do I know when the brownies are perfectly baked?
The brownies are done when a toothpick inserted into the center comes out with moist crumbs but no wet batter, typically after 40-45 minutes. The surface should be set and slightly crackled. Avoid overbaking as this will make the brownies dry rather than fudgy. Start checking at the 40-minute mark since oven temperatures can vary.
- → Can these brownies be made in advance for an Easter gathering?
Absolutely! These brownies actually benefit from setting overnight, allowing the flavors to develop further. You can make them 1-2 days before your Easter gathering and store them in an airtight container at room temperature. If making more than 4 days ahead, consider freezing them and thawing before serving.
- → What's the best way to get clean cuts when slicing these brownies?
For perfectly clean cuts, chill the completely cooled brownies in the refrigerator for 30-60 minutes before slicing. Use a sharp knife that's been run under hot water and wiped dry between cuts. You can also use a plastic knife, which surprisingly works well for cutting brownies without dragging the crumbs.
- → How can I adapt this for different holidays throughout the year?
This versatile brownie base works wonderfully with different mix-ins for various holidays. Replace Mini Eggs with orange and black M&Ms for Halloween, red and green candies for Christmas, or heart-shaped chocolates for Valentine's Day. You could also swap the Mini Eggs for seasonal chocolate candies, nuts, or flavored baking chips to create themed brownies year-round.
- → Can I make these brownies gluten-free?
Yes, you can make these brownies gluten-free by substituting the all-purpose flour with a 1:1 gluten-free flour blend designed for baking. Be sure to verify that your cocoa powder and Mini Eggs are also gluten-free, as some candy coatings may contain gluten or be processed in facilities with wheat.