 Save to Pinterest
 My daughter burst through the kitchen door that spring morning with a magazine clipping clutched in her tiny fist—an Easter bunny cake that made her gasp. We'd never attempted anything so playful before, just standard round cakes and frosting, but something about this whimsical creature made us both want to try. That afternoon, flour dusted our counter, the mixer hummed its familiar song, and we discovered that a cake could be so much more than dessert when shaped with intention and decorated with joy.
The year my nephew turned four, his mother called asking if I could make something special for his party. I'll never forget his face when he saw this bunny sitting there on the table, surrounded by real eggs in baskets—he genuinely believed it might hop away. That moment taught me that the best recipes aren't always the most complicated; they're the ones that make someone feel like magic is real for a little while.
Ingredients
- All-purpose flour (2½ cups): The foundation of a tender crumb, and sifting it with baking powder matters more than you'd think—it prevents lumps and ensures even rising throughout that bunny head.
- Baking powder (2½ tsp): Don't skip the precise measurement here; too little and your cake will be dense, too much and it'll peak dramatically in the center then sink.
- Salt (½ tsp): This small amount awakens all the sweet flavors and keeps the cake from tasting one-dimensional.
- Unsalted butter (1 cup for cake): Room temperature is non-negotiable—cold butter won't cream properly and you'll end up with a dense, heavy cake instead of the fluffy texture that makes this special.
- Granulated sugar (2 cups): This sweetness carries through the entire cake, so use fresh sugar that hasn't clumped in your pantry; old sugar can affect texture.
- Large eggs (4): Room temperature eggs incorporate smoothly and create that tender crumb; cold eggs resist blending and can make your batter look curdled.
- Pure vanilla extract (1 tbsp): Real vanilla makes a noticeable difference in taste compared to imitation, though either works if that's what you have on hand.
- Whole milk (1 cup): It's the moisture that keeps this cake tender for days, and whole milk's fat content actually matters for the final texture.
- Unsalted butter for frosting (1 cup): Same softness rule applies here—if your butter is warm enough to leave a fingerprint, you're ready to beat it.
- Powdered sugar (4 cups, sifted): Sifting removes lumps that would create a gritty frosting no matter how long you beat it; this single step changes everything.
- Sweetened shredded coconut (2 cups): This creates that signature fluffy texture that makes the bunny look real enough to pet—the sweetness is already built in, so taste as you go if adding more.
- Pink food coloring: Just a few drops tint the frosting for inner ears and nose; gel coloring works better than liquid if you have it, since liquid can thin your frosting.
- Jelly beans or candy-coated chocolate eggs: These are the bunny's eyes and decoration, so choose candies you actually enjoy eating since you'll be sampling them during assembly.
- Licorice strings: They become the whiskers and add a playful detail that children find absolutely hilarious.
- Mini marshmallows: Soft, pillowy, and perfect for the tail and cheeks—they stay in place without additional frosting tricks.
- Black edible gel or chocolate chips: For eyes and nose, use what works best with your hands; gel is easier to apply precisely but chocolate chips are more foolproof.
Tired of Takeout? 🥡
Get 10 meals you can make faster than delivery arrives. Seriously.
One email. No spam. Unsubscribe anytime.
Instructions
- Prepare your pans:
- Preheat your oven to 350°F and grease two 9-inch round pans with butter or cooking spray, then dust with flour so your finished cakes release without sticking. This step only takes a minute but prevents the frustration of a broken cake later.
- Combine dry ingredients:
- Whisk your flour, baking powder, and salt together in a bowl, making sure everything is evenly distributed. This ensures your leavening works throughout the cake rather than creating pockets of unevenness.
- Cream butter and sugar:
- Beat the softened butter and sugar together for about three minutes until it's pale, fluffy, and looks almost like wet sand. You'll actually hear the mixer change sound as it aerates—that's your cue that you're building the foundation for a tender cake.
- Add eggs and vanilla:
- Add eggs one at a time, beating well after each addition so they incorporate fully before the next one goes in. This prevents that curdled look and creates a stable emulsion that traps air.
- Alternate wet and dry:
- Starting and ending with the flour mixture, alternate adding your flour and milk to the butter mixture, beginning with about a third of the flour. Mix on low speed just until combined—overmixing develops gluten and creates a tough cake, which is the opposite of what we want here.
- Fill and bake:
- Divide batter evenly between pans, smooth the tops with a spatula, and bake for 30 to 35 minutes until a toothpick comes out clean. Your kitchen will smell absolutely incredible during this time, and yes, it's tempting to open the oven—resist it.
- Cool completely:
- Let cakes cool in the pans for 10 minutes, then turn them out onto wire racks to cool completely. Trying to frost a warm cake is a recipe for melting frosting and a sad assembly situation.
- Make the frosting:
- Beat your softened butter until it's smooth and creamy, then gradually add the sifted powdered sugar, milk, and vanilla, beating until fluffy and spreadable. This should take about three to four minutes total, and you'll know it's ready when it becomes pale and light.
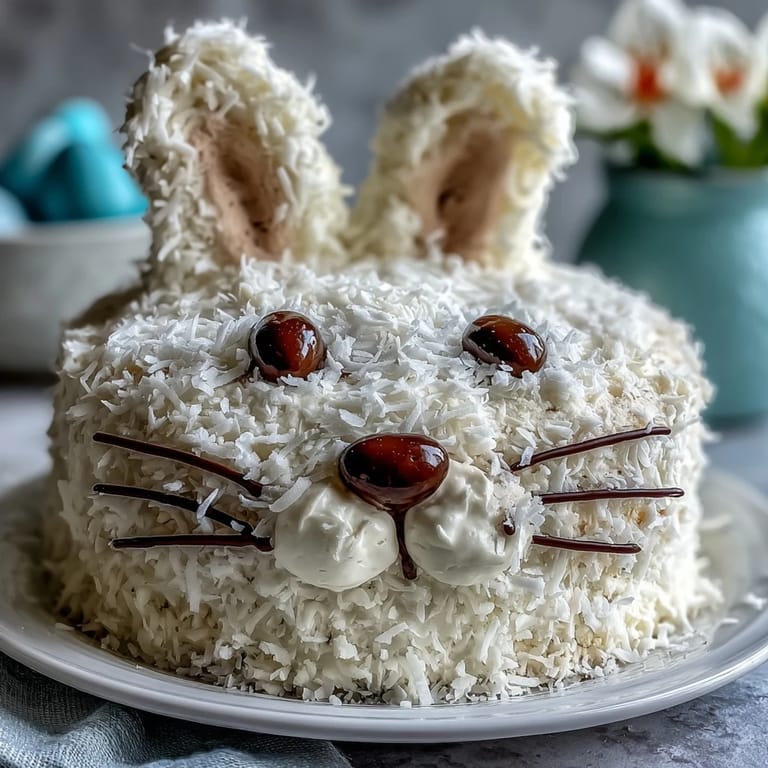
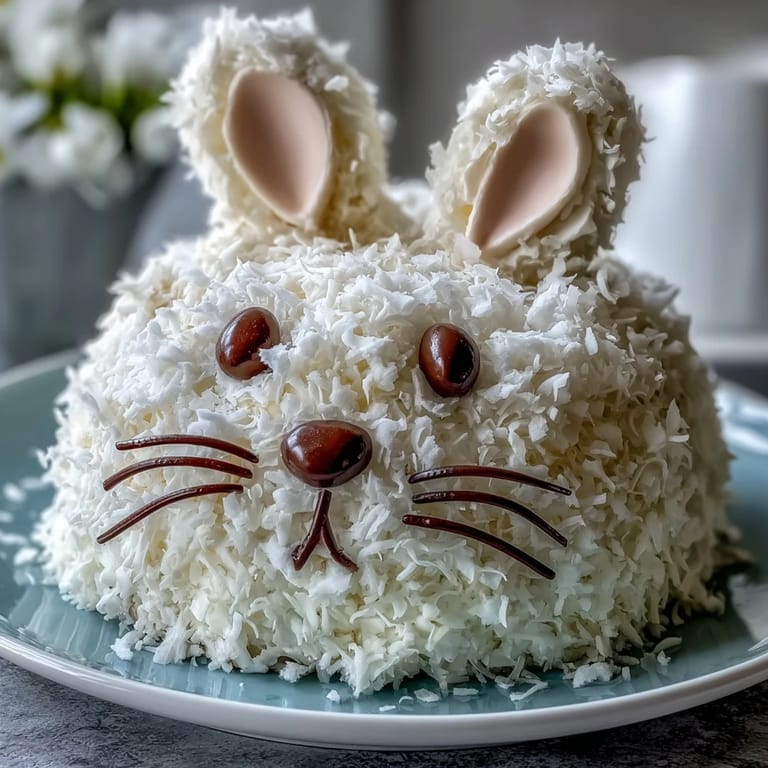
- Tint the ears:
- Set aside half a cup of white frosting and tint it pink for the bunny's inner ears and nose using just a few drops of food coloring. Reserve this before you add the coconut to the main batch.
- Shape the bunny:
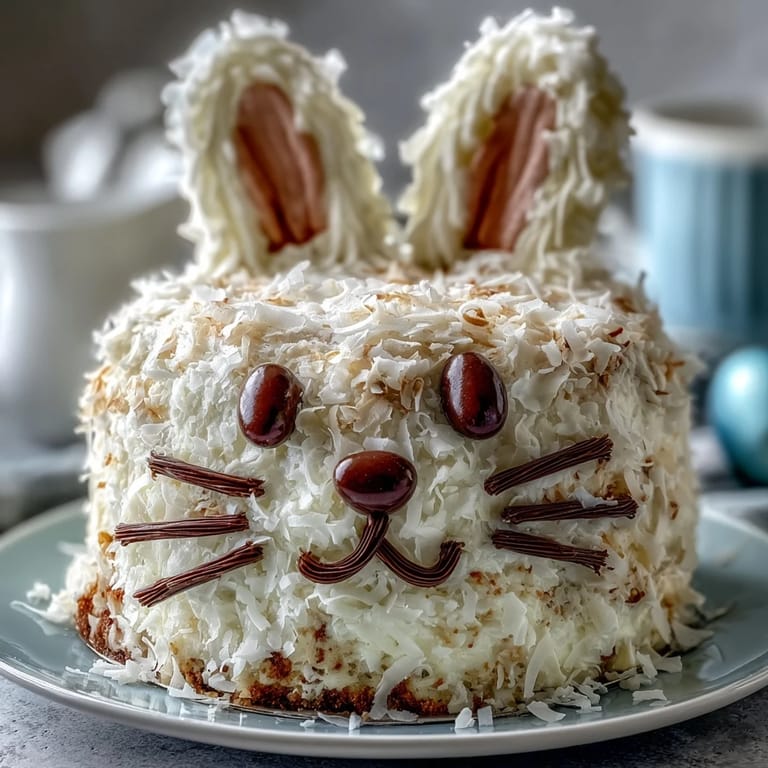
- Cut one round cake into ear shapes and a bow tie using a serrated knife and a template as guide, then arrange one full round cake as the face with the ear shapes above and bow tie below on your serving board. This is the creative moment where your bunny comes to life, so don't stress about perfection—personality trumps precision.
- Apply crumb coat:
- Spread a thin layer of white frosting over the entire assembled cake, which catches all those loose crumbs so your final frosting stays clean. Chill this for 15 minutes until it sets.
- Frost and coconut:
- Generously apply your remaining white frosting, then immediately press shredded coconut over all the frosted surfaces while the frosting is still soft enough to grip it. Work in sections so the frosting doesn't dry out before you add the coconut.
- Add pink details:
- Use your reserved pink frosting to fill in the inner ears and nose, which creates that classic bunny look. A small offset spatula or even a butter knife makes this easier than trying to pipe it.
- Decorate the face:
- Add jelly beans or candies for eyes, chocolate chips or gel for the nose, licorice strings for whiskers, and mini marshmallows for cheeks and a fluffy tail. This is where everyone's creativity shines, so arrange things exactly as feels right to you.
 Save to Pinterest
 I made this cake three times in one month because people kept asking for it—once for the school auction, once for a birthday party, and once because my neighbor smelled it baking and couldn't resist asking if we'd make one for her grandchild's visit. That's when I realized this recipe isn't just about following steps; it's about creating an experience that makes people want more of it in their lives.
The Secret to a Perfect Crumb
The texture of this cake depends entirely on not overmixing after you add your flour and milk. I learned this the hard way when I thought more beating would make it smoother—it just created a tough, dense cake that looked sad compared to the fluffy version I was aiming for. Low speed, just until combined, then stop even if it looks slightly rough. The oven will finish the job for you, and you'll end up with something tender enough that it practically melts in your mouth.
Why Coconut Frosting Works Better Than You'd Think
Coconut frosting on a vanilla cake isn't just delicious—it's forgiving in ways that other frostings aren't. The shredded coconut adds texture and visual interest while also hiding minor imperfections in your frosting job, so you can focus on making the bunny shape charming rather than perfectly smooth. The mild sweetness of coconut also balances the sugar in the frosting, preventing that cloying taste that can happen with plain buttercream when you're eating multiple slices.
Assembling Your Bunny with Confidence
The bunny shape is genuinely easier to pull off than it sounds, even if your ears look slightly wonky or your bow tie isn't perfectly symmetrical. Kids will love it for being quirky, and adults will appreciate the effort and creativity that went into making it.
- Use a printable Easter bunny cake template from online to trace your cutting guide, which takes the guesswork out of where to cut.
- A sharp serrated knife makes cleaner cuts through cake layers than a regular knife, so invest thirty seconds in finding the right tool.
- Don't stress if pieces crumble slightly during cutting—that's why the crumb coat exists, and frosting forgives everything.
 Save to Pinterest
 This cake has become my go-to for spring celebrations because it delivers joy on a plate while staying remarkably manageable in the kitchen. Watch someone's face light up when they see it—that reaction never gets old, and it's absolutely worth the hour and a half it takes to create.
Common Recipe Questions
- → How do I shape the cake into a bunny?
After baking, cut one round cake into ear and bow tie shapes. Arrange these pieces on the whole cake to form the bunny features before frosting and decorating.
- → Can I substitute the coconut in the frosting?
Yes, toasted coconut can add extra flavor, or cream cheese frosting can be used for a tangier twist.
- → What is the best way to decorate the bunny's face?
Use pink tinted frosting for inner ears and nose, jelly beans or candy for eyes, chocolate chips for nose detail, licorice strings for whiskers, and mini marshmallows for cheeks and tail.
- → How far in advance can I prepare this cake?
Cake layers can be baked a day ahead and stored wrapped tightly. Assemble and frost closer to serving time for best freshness.
- → What baking tools are recommended?
Two 9-inch round pans, electric mixer, mixing bowls, spatula, serrated knife for shaping, and offset spatula for frosting are needed.